
How to Resize An Image on a Mac
This post may contain affiliate links which means I make a commission if you shop through my links.
Disclosure Policy

This is how to resize an image on a Mac using Preview. For bloggers, this is a quick and easy method of getting the image sizes that you need for your blog posts.
You may have noticed that I use many different image sizes in my posts on this blog.
I do this because every social media site has a different ideal image size for photos.
For example, if you want pictures to look good in your Twitter stream (horizontal), they need to be a different dimension than images that you use for Pinterest (vertical).
If you are a blogger, knowing how to resize images on a Mac (sorry, I don’t do Windows), is a real timesaver.
There are different image editing websites like PicMonkey and Canva that let you resize images – but the easiest method, in a pinch, is using Preview on a Mac (and you thought it was only for PDF’s!).
How to Resize Images on a Mac Using Preview
1. Make a Copy of Your Original Image
Whenever you plan to edit an image it is always best to work with a copy of the original file, in case you don’t like the results.
This is true even on a Mac despite all of the time machine capabilities.
2. Open the Image Copy in Preview
Most of the images that I use for this blog are in .jpg or .png format.
Preview will open both of these file types.
So double click on your file to open it.
3. Click on “Tools” in the Top Menu Bar
Now click on “Tools” in the top menu bar and click on “Adjust Size” from the drop down that opens up.

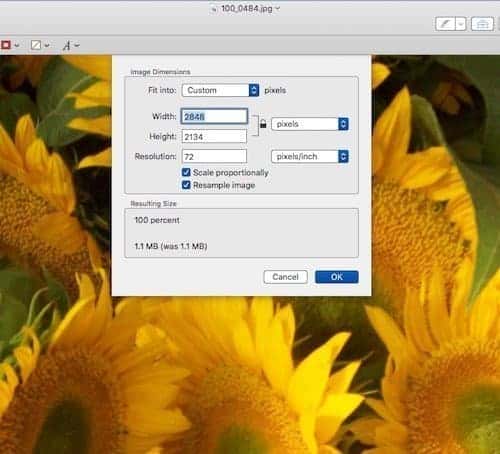
4. Enter Your Desired Dimensions
In the drop down that opens up – you can now select your desired dimensions.
The first field called “Fit Into” has some predefined selections but I always choose “Custom”.
The next fields are for Width and Height.
There is also a lock symbol next to these and a drop down for units of measurement.
For websites the unit of measurement is typically pixels.
The lock symbol keeps the height and width proportionate to each other so when you change one number, the other changes proportionately.
This is so you don’t get those elongated or squished and distorted resized images.
The dimensions that you choose will depend on many different factors.
Your blog template is one consideration as well as your intended social media share platform.
Don’t Resize Images in WordPress
Generally WordPress will automatically resize a large image to fit your template BUT large image sizes will slow your site down – even thought the photos look ok online.
And Google does not like slow sites.
It is a best practice to resize your image to a reasonable size for the web before uploading it to your blog.
The next field is for resolution.
I keep mine at 72 which is a good size for the web.
However, if you plan to print your images at large sizes – it is best to keep the resolution number high if it comes up that way.
I leave scaling and resampling checked and hit Ok.
How to Reduce the Image File Size
In this post I am talking about how to resize the actual dimensions of your photo.
This process reduces the image file size somewhat.
However, if you are uploading images to a blog or website – you should also compress your images to make the file size even smaller.
This is easily done with a plugin called ShortPixel.
I used to try to compress images in Preview on a Mac but this was an inefficient and tedious process.
You see, WordPress creates several different image sizes from the one image that you upload (your theme will use thumbnails, featured image sizes, etc).
The ShortPixel plugin will compress all of these different sizes behind the scenes so you don’t even have to think about it.
Final Thoughts
Knowing how to resize images on a Mac using Preview will make blogging so much easier for you.
As you can see, it is pretty simple. But it does take a little trial and error.
My suggestion to you is play around with it.
Make copies of a few photos that you have on your computer and practice changing the dimensions.
You will probably find that resizing is a good place to start – but you might actually want to crop your image first, before you resize, in order to get the dimensions just right.
Luckily, Preview can also handle cropping images – but that is a story for another tutorial.
How Do You Resize Images for Your Blog?
Have you used Preview on a Mac to resize images before? Or is this a new trick for you?
Let us know in the comments below.
And if you use a different method – tell us about that too!


Thank you so much for publishing the article. I think you hit the nail on the head with your crucial debate on resizing images for Amazon in Photoshop tutorial.
You didn’t do Windows, but maybe you should. I think the article would be much more simpler than this one since Windows has a million different possibilities for image resizing. I am a windows user and I use PaintShop for my image resizing. There are also free possibilities but they do not guarantee the image quality to be preserved. If you have PaintShop or wish to get it, here are steps how to resize images http://www.paintshoppro.com/en/pages/resize-images/
Hope it helps 🙂
Hi Donna,
There are so many options out there for resizing images – from Mac specific and Windows specific apps to web based solutions like PicMonkey and Stencil.
This post was geared specifically towards Mac users who are just learning about working with images and may want to start with an app that they already have. Personally, I am a Mac user and Preview is a quick and easy solution for me to resize an image on the fly, the same way that PaintShop probably works for you.
Thank you for sharing a solution for people that use Windows, since that is not my area of expertise. 🙂
Hi Neena, Picresize is another option. It’s a free web-based app. It will resize your image. It lets you add special effects (badges, etc.). Saves your image in various formats.
Hi Steve,
Thanks for the resource.
It’s always good to have a number of tools at hand to work with images – especially if you have a website.