How To Use Evernote Effectively: Step 2 Collect Notes
This post may contain affiliate links which means I make a commission if you shop through my links.
Disclosure Policy

Now that you have the Evernote app installed on all of your devices (see Evernote Step 1) AND you know your password, you are ready to start collecting notes.
If you don’t have Evernote yet – make sure you compare plans before you get started.
Most of us think of notes in the traditional sense. The kind that you type in.
But really, that kind of note is very limiting.
Because typing a note takes time. And nobody has enough of that.
If you just use Evernote to type notes – you are missing the value in using the app.
The power behind a good note taking app is having the ability to store and find a variety of different note types whenever you need them.
Evernote does this really well.
You can collect a lot of different types of information in Evernote.
The Types of Info You Can Collect in Evernote
In this post I will use Evernote for Mac for most of my examples – but you should be able to carry the concepts to different platforms.
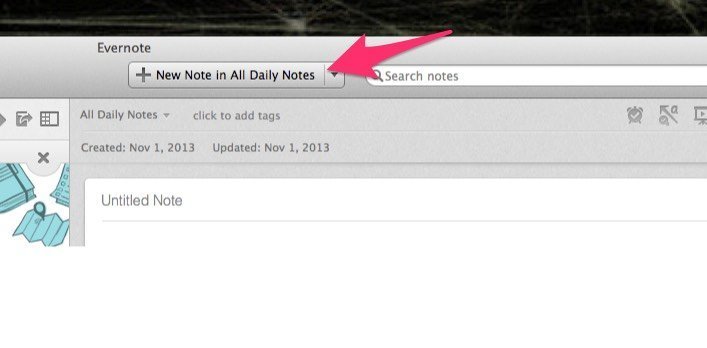
1. Typed Notes
If you must type a note, Evernote lets you do that.
On my Mac, I just fire up the app, and right there at the top of the page is a button to type a new new note in my default notebook.
2. Dictate Audio Notes
Dictating notes is a good thing – it doesn’t take as long as typing.
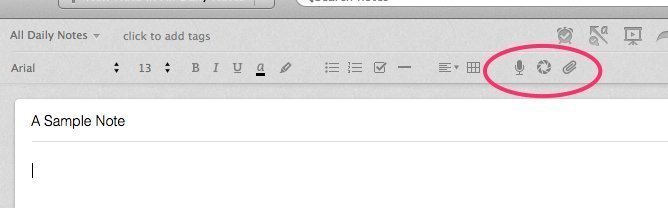
On a Mac, start the Evernote App, type in a title for your note and click into the body of the note just as you would for typing a note.
You will now see a few little icons to the top right of your note.
One of these is a microphone. Click on this and start recording.
3. Take Hybrid Notes
I call these Hybrid notes because you speak the note, and your iPhone or iPad transcribes it into typed text for you.
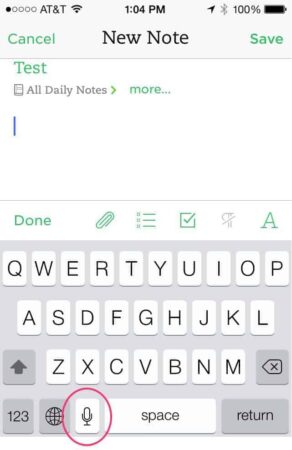
Just start the Evernote App on your iPhone.
Click the + sign to start a new note.
When the keyboard pops up, you will see a microphone key right next to the spacebar (this is not unique to Evernote – it is an iPhone feature).
Click on the microphone and start speaking.
The iPhone or iPad will take what you say and type it out.
You will need to speak your punctuation for it to appear. For example you would say “I need to buy a coat comma a hat comma and gloves for the winter period” for it to show up as “I need to buy a coat, a hat, and gloves for the winter.”
As long as there is no background noise and you speak clearly, the transcription is pretty good.
4. Photos Can Be Notes Too
You can add photos to any note simply by dragging the photo onto the note that you currently have open.
Alternatively, you can click on the shutter icon at the top of the note to take a picture with your Mac’s camera, or you can click on the paperclip to navigate to a file or folder that has the photo that you need .
If you use Apple Photos you can drag a photo right out of that app and into your note in Evernote.
On an iPhone the capability is even better.
In a new note, you can click on the paperclip icon and then you will have a choice to take a photo or attach an existing one.
If you choose to take a photo – there are even more choices!
You can take a regular photo or choose a format for post it notes (if you select this and then take a picture of a physical post it note, it comes out formatted nicely and clearly) or a format for a photographing a document.
Again the text really stands out when you use this feature.
5. Add Documents to Evernote
Storing documents in Evernote is what makes this app truly useful.
We get information daily on our computers.
Forms, statements, pamphlets, newsletters, ebooks – many of these come to us in PDF format.
You can store these in a file on your computer, in your email programs, or in cloud services like Dropbox or iCloud.
But tracking them all down when we need them can be a pain.
Keeping them all in one location saves a lot of time and frustration.
In Evernote, all you need to do is drag the document onto an open note, or onto the Evernote icon in your Mac dock. Your PDF is now in Evernote.
There are even more ways to get those documents into the app, such as emailing the PDF to your Evernote account, scanning into Evernote and printing directly to Evernote.
If you are an Evernote Premium user then your PDF files will also become searchable.
For example, let’s say you have an Evernote notebook for all of your recipes. Each note contains a recipe in PDF format.
Now, let’s say you have some fresh basil that you want to use up. You can search Evernote for the term “fresh basil” and it will find the recipes that contain those words – even if the words are NOT in the title or the tags.
Evernote can also store different types of files like excel, word, and Apple Pages, Sheets, and Keynote documents.
6. Use the Evernote WebClipper
The Evernote WebClipper is probably the most powerful feature in Evernote – in my opinion.
I have tried other note taking apps and nothing else can really compare.
Once you install the WebClipper extension you can capture web pages, portions of web pages, articles, or pdfs.
You can even annotate your clips or screenshots to highlight the important items.
The best part is that the extension is available for a variety of browsers including: Chrome, Safari, Internet Explorer (IE) 7+, Firefox, Opera, and Microsoft Edge (for Windows 10 or higher).
On mobile you would just use the Share extension to add your page to Evernote.
The web clipper makes collecting research so easy.
Learn More About Evernote
As you can see, when it comes to Evernote, the definition of “note” is pretty broad. You can type notes, record audio notes, dictate notes, add documents and a variety of file types, and clip and tag web pages.
Each notebook is more like a scrapbook, where you can store all kinds of different files.
Find out more about getting started with Evernote:
Here is a quick overview of the Evernote app.
Step 1: How to Install Evernote on all of Your Devices
Step 2: You are here.
Step 3: Organize your notes in Evernote