How Use Filters in Gmail to Clean Up Your Inbox Fast
This post may contain affiliate links which means I make a commission if you shop through my links.
Disclosure Policy

Your email inbox is one of the hardest things to keep organized. It’s like a never ending cycle – as soon as you clean it up, more comes your way. If you are a Gmail user, then this is a tutorial on how to create a filter in Gmail might come in handy.
A filter is tool built right into Gmail that can help you clear out your inbox quickly. This is how you do it.
Filters Are Best For Non-Urgent Type Email
Let’s face it – we all get a lot of email. Some of it is important – as in the read it now, it can’t wait, emergency kind of way. But much of our email is kind of repetitive in nature. It’s stuff that we may need in the future – but don’t necessarily want to deal with right now. It is this non-urgent stuff that can really clog up our inboxes.
The good news is that Gmail has a built-in filter tool that can help you clean up your inbox – and keep it that way – automatically.
You can use it to sort any email that you receive but, personally, I think it is best used on the non-urgent type. I like my most important emails to wind up in my inbox so I don’t miss something urgent.
But things like sale announcements from stores that I shop at – well, I don’t mind if those bypass my inbox and get filed into a label automatically. When I am ready to shop, I can open the label (folder) that I have for that store and view the latest email.
An Example of How Using Filters In Gmail Can Save You Time
Let’s say that you receive a lot of emails from the ABC Department Store. They send you tons of email with coupons and information about sales. These emails are useful to you – but ONLY when you plan to go shopping at ABC.
The rest of the time they just clog up your inbox. And then – when you actually do go shopping at ABC – you can’t find the email with the latest coupon – so you don’t get the discount anyway. 🙁
To make sure that you never experience this frustration again, you can set a filter in Gmail. When you receive an email from ABC Store you can set the filter to automatically have it skip your inbox and send it to a specific folder (in Gmail this is called a Label). You can further process these emails that you receive from ABC so that they are marked as read.
Now, when you happen to pop into the ABC Department Store either online or in store – you can open the ABC email folder on your smartphone and quickly find the latest coupon to show to the cashier at checkout.
Setting up that filter has saved you time on both ends. By circumventing your inbox, you don’t have to manually file away the email – this saves time. And when you shop, you don’t have to spend time searching for the email, you know exactly where to find it.
The Step-By-Step Tutorial
Even though creating a filter in Gmail is pretty straightforward, I will walk you through it on a computer using the Chrome browser, because you might find some of the settings hard to find.
Step 1: Go To Gmail Settings
The first thing you do is open up your Gmail account in a browser. (Even if you get your email in Apple Mail or Outlook – you will need to set up the Filter directly in Gmail on the web).
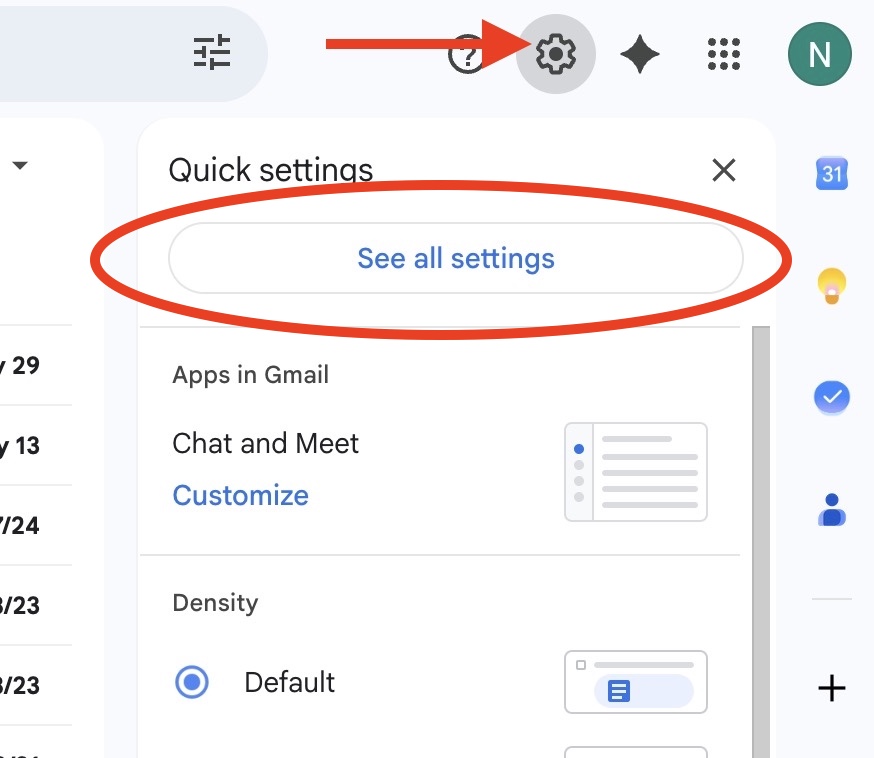
In the upper right hand corner of your screen in the same line as the Gmail search bar – you will see a little gear icon. Click on this. This will open up your “Quick Settings”.
In the dropdown, select “See All Settings” which currently is a pill shaped button directly under the Quick Settings title. It is the very first item in the dropdown menu. (See the screenshot above.)
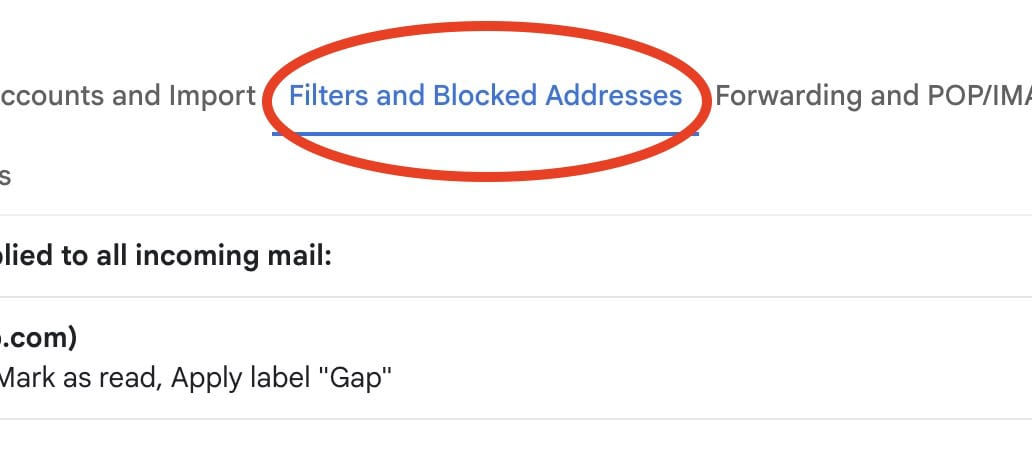
Step 2: Find the Filters Tab
Once you are in the full Settings screen, you will click on the “Filters and Blocked Addresses” tab in the Settings window as seen in the screenshot above. It is a menu item that is located towards the middle.
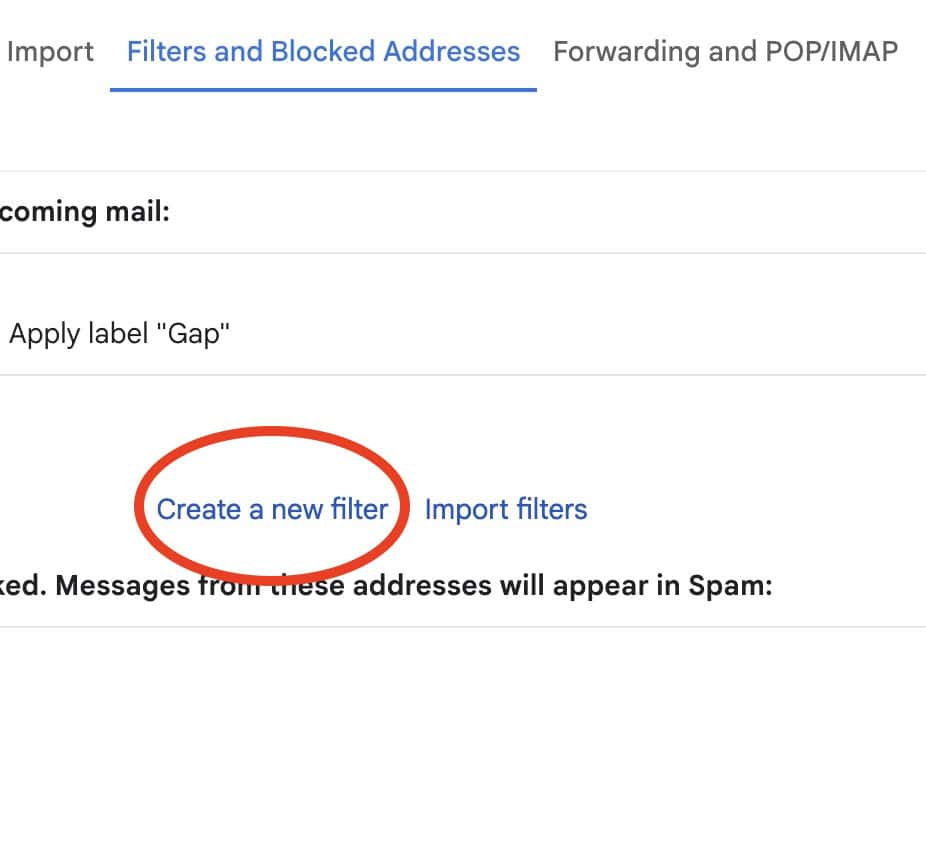
Step 3: Create a New Filter
The next step is to click on the “Create a new filter” link in the middle of the window that appears.
Step 4: Set the Criteria For Your New Filter
In the box that opens up, you will set your criteria for the Filter. What this means is that you can choose which emails you want the Filter to apply to. As you can see from the below screenshot – you can use a variety of criteria to filter your email:
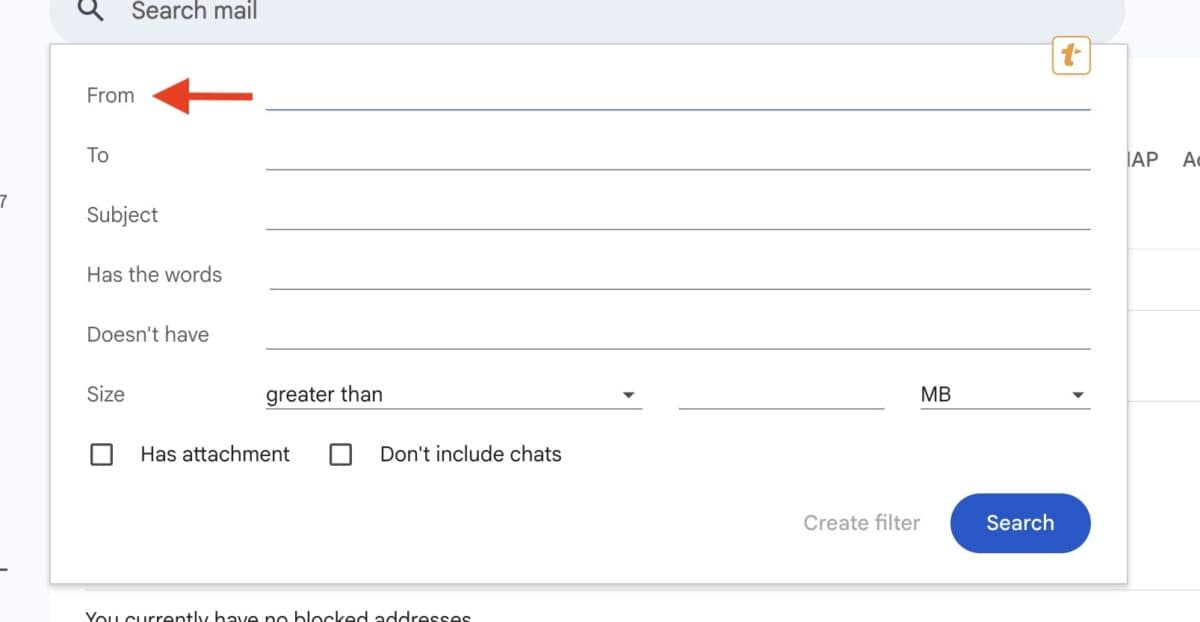
You don’t need to fill out every line item in this form – just the ones that apply to what you want to accomplish.
In our example, we would enter the name of the company or their email address in the “From” field to find all of the emails that come from ABC.
One way to find the “From” email address by opening an email that you already received and copying the address of the sender. In fact, Gmail is pretty smart this way. You don’t need to type in the whole email address. You could just type in, for example – ABCDepartmentStore – if that is in the from address – and it will find all emails that come from senders on that domain.
When you have set your criteria – you click on “Create Filter” in the bottom right-hand corner. (You can see it in the above screenshot in the bottom right – I don’t know why Google makes the typeface so small and hard to notice.)
Step 5: Set The Actions for Your Filter
The next screen that opens up is where you will set the actions for your new filter in Gmail. On this screen, you will tell Gmail what to do when it finds an email that matches the criteria that you set in the previous step.
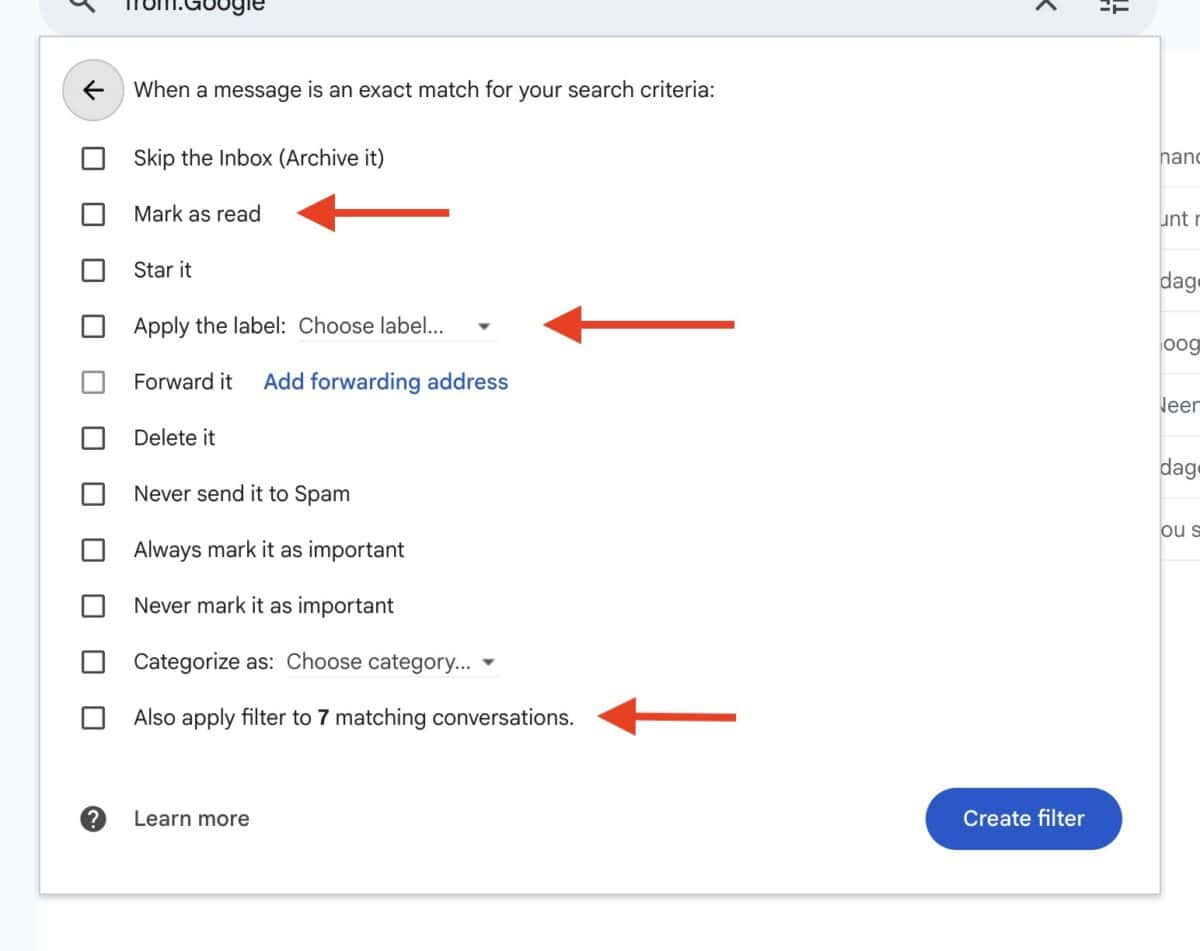
In our ABC example, we would check the first box to skip the inbox. Then we would check the second box to mark it as read. Finally we would check the box next to “Apply the Label:”. In the dropdown next to this option, we would pick the label that we want. If we don’t have an existing label that we want to use we can create a new one here as well. (see below.)
Useful Tip: Click “Apply To Emails Already in Inbox”
Here is a sneaky little tidbit that will have you down to inbox zero in no time.
When you create a filter in Gmail, you can have it apply to emails that are already in your inbox as well as the new emails that come in from this day forth. On the screen where you select the actions for your filter – there is a choice to “Also apply filter to x matching messages”. In a real case, the “x” will be replaced with the actual number of emails in your account that match your criteria.
In the screenshot above – you can see that Gmail has found 7 emails that are already in my inbox that match the criteria for my filter. If I check this box – Gmail will take these emails and process them too.
So, let’s say ABC has sent me emails in the past that I have ignored and they are just sitting my inbox. Gmail will take them out of my inbox, mark them as read, and assign them the proper label.
A Word on Labels and Folders
If you use Apple Mail to check your Gmail – your Gmail “labels” become “folders” in the Apple Mail interface.
You may want to set some practice filters for more unimportant type emails. This is just to see how Gmail will process them and also where they end up in your Apple Mail.
You may need to adjust some of your sync settings in Apple Mail or another email client to make sure everything shows up where you need it to be.
Filters Are A Quick Way to Clean Up Your Email Inbox
As you can see, filters are a powerful tool for organizing your email inbox. By setting just a few parameters, you can sweep hundreds of email messages into appropriate labels (folders). Since they will then be grouped by sender, you can quickly go through the email in single label at your convenience.
Whenever you are trying out a new tool like this one, I suggest creating a sample filter to test it first, and make sure the results of your filter are exactly what you want. It is important that your urgent and actionable email messages don’t get lost in the shuffle.
And once you hit inbox zero, it is easy to process new email by making it one of the 10 core tasks you should do daily to stay organized.
One last note, Gmail changes their interface faster than I can keep up with it. So, if your options look slightly different than my screenshots, just poke around and look for it. The location might change but the feature should still be there. I know that I have been using filters for at least 10 years. Be sure to check out our Digital Organization Guide for more tips.


Does this have to be done separately for each email that you want to deal with?
Thank you
Dear Neena, I followed the instructions in this article carefully and set up filters for certain senders in my inbox. Now my Primary, Promotions and Social tabs have disappeared. I can’t find a way to reset gmail to default settings. I am miserable. How do I reset gmail to default settings?
Hi Lori,
This Google Help article should get you back to the default and being able to see all your tabs: https://support.google.com/mail/answer/3094499?co=GENIE.Platform%3DDesktop&hl=en
🙂
Hi Neena,
I am job hunting since March this year as I have lost my job for believe it or not: ‘doing the right thing’
However, thank you very much as this was and is currently the next best thing to sliced bread in my everyday life and days to come.
My inbox of nearly 18300 mails have ‘automaically’ vanished, thanks to you.
Hi Dewald,
Best of luck with your job search. I am so happy that this article helped you!
Thank you so much Neena! ♥ It was a very helpful! Now my email will be clean and clear!
You are welcome, Vihra!
Thank you, Neena for your easy to understand Gmail Filter guidelines. Very nicely explained. Thank you.
Thank you! I’m so glad it helped you. 🙂
Thank you so much, you made this easy. I know how to do this in Outlook at work, but did not know it was an option for Gmail. Do you know if there is a way to group gmails in the Inbox by Subject or From
Hi Alan,
Glad to have helped. 🙂
As to grouping emails in your gmail inbox – you can group items by label.
So, you can set up a filter to automatically label certain messages and then group these labels in your inbox.
Go to Settings and then select Inbox across the top tabs. In Inbox type select Priority Inbox. In Inbox Sections (which shows up when you select Priority Inbox), pick one of the numbers and click on the dropdown arrow next to options or add section. In the dropdown that appears choose “more options”. Then you can choose “Show all from label”.
I am not sure if this is exactly what you are looking for but I think it is the closest option.
I’m trying to figure a way to ‘move’ selected emails in Gmail all at once. When I do a search in the box for ‘ABC’ email, Gmail finds all. Some I may have already labeled/filed but inbox gets flooded so missed some. I check select all but Gmail doesn’t offer a “MOVE” option at this point. I always have to go back to Inbox then select move. I’ve learned the hard way though some of the ‘selected’ emails remain checked even if on pages not visible…. I hope this makes sense, but I wish they, Gmail, had a better way to select a ton or group emails and move them to label made….
Hi Marsha,
If I understand correctly, you should be able to set up a filter using the method that I outlined to assign a label to email that is already in your inbox.
Make sure you click the checkbox next to “Skip the inbox (Archive It)” and also the check the box next to “Apply filter to x number of matching messages” – see the headline in my article called – An Amazingly useful Gmail tip.
This should “Move” everything that you received – from the sender that you designate, out of your Inbox and also give the emails the label that you designate.
Once you apply the filter to the matching messages in your inbox, be sure to go back and delete the filter right away, otherwise, any future email that you receive from that particular sender will skip your inbox (meaning that you might not see the email come in) and will automatically get labeled – unless this is what you want to have happen.
Hope this helps. 🙂