How to Get Rid of Tabs Gmail Tabs and Go Back to One Inbox
This post may contain affiliate links which means I make a commission if you shop through my links.
Disclosure Policy
If tabs in your Gmail inbox are driving you CRAZY – don’t worry, you can get rid of them. This is how to get rid of Gmail tabs once and for all.
You might wonder why you would want to get rid of these tabs – after all they are supposed to help you keep your inbox organized.
But I think it actually makes it harder for you to check your mail because you now have to check five inboxes instead of just one.
Luckily, there is a way to turn this off and go back to the way things were.
Gmail Tabs Actually Create Five Inboxes
By default, Gmail has created 5 tabs for you –
- your main inbox,
- Promotions,
- Updates,
- Social,
- and Forums.
Based on the nature of the types of email that you receive, Google does its best to sort the new mail into these categories.
So here’s the kicker – to really check all of your new email – you will have to go into each tab individually to see what landed there.
Also, if you use any kind of Gmail alerts – you will only be notified if you have new mail in your main inbox, not in any of your tabs.
On top of that, Gmail is acting as your secretary.
How does it really know what messages belong in each tab?
Read on if you are sick of tabs too …
How To Turn Off Gmail Tabs
Go to Your Gmail Settings for Your Inbox
Just click on the Settings gear icon in the upper right hand corner of your Gmail screen. Select “Settings” from the dropdown menu.
Next, click on the “Inbox” tab across the top of the settings screen.
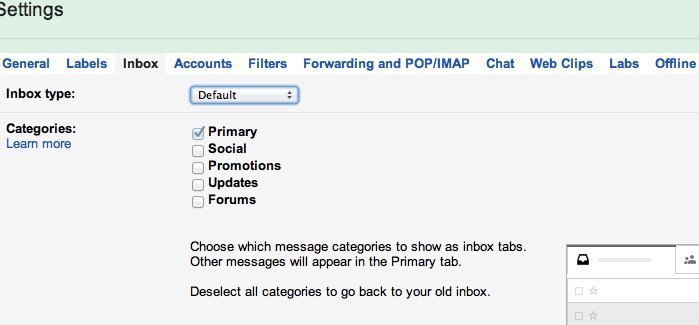
Deselect Everything Except Primary
Then, in the second section below labeled “Categories” deselect everything except “Primary”. This means that only the Primary category will be checked.
Now your Inbox will be back to normal with no tabs.
UPDATE: There is now a little shortcut to get to the setting for your Gmail tabs. When you click on the Settings gear icon, you will see an option called “Configure Inbox” in the dropdown menu. If you click on this you get a little popup window where you can check the tabs you want to see in your Inbox.
But wait …
Organize Your Gmail Inbox With Sections
While you are in Gmail settings – you may want to consider a better way of organizing your Gmail inbox.
A Word of Warning Before You Begin
If you organize your Gmail Inbox using this method – do not click the select all box at the top and then delete messages!
If you do this, it will delete all the messages that show on the front page, not just the messages in the top section.
So, you could inadvertently delete your Starred messages and your other messages as well.
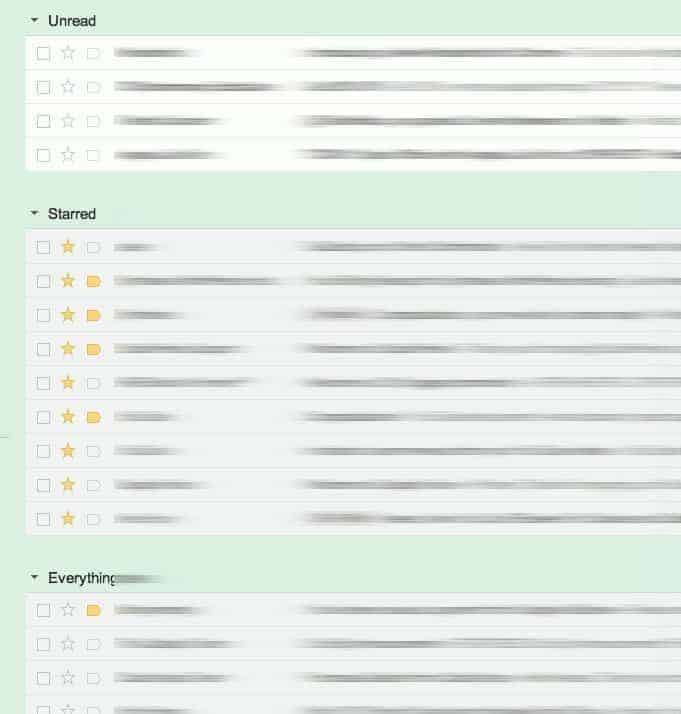
I like to split my mail into 3 sections (NOT tabs).
The top section contains Unread email.
The second section contains email that I (not Google) have starred as important.
And the third section is basically everything else.
You can create sections in your Gmail Inbox as follows:
- Click on the Settings gear icon to take you to the Gmail settings (if you are not already there)
- Click on the Inbox tab across the top of the Settings screen
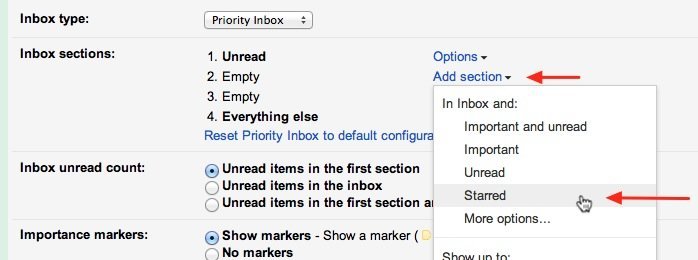
- In the first section labeled “Inbox type” select “Unread first” from the dropdown menu.
- Next click on the “Customize in Priority Inbox” link
- Leave number 1 as “Unread”
- In number 2 select “Starred” from the Options dropdown menu.
- Click the Save Changes button at the bottom of the screen.
- Now your Gmail Inbox will look like this – 3 sections and easy to navigate – all on one screen with NO tabs to check.
Don’t Let Gmail Take Over Your Inbox
If you don’t like Gmail tabs you can do something about it.
There is no need to get frustrated looking in 5 different places for that one important message.
Take a minute to visit the settings in your Gmail account and make the adjustments described above.
You might also want to poke around at some of the other features while you are there.
I like to divide my inbox into three sections of
- Unread,
- Starred,
- and Everything Else.
Gmail is a pretty powerful application, so don’t just settle for out of the box.
Make it yours.
If this tutorial was helpful to you – please share it with your friends on Facebook or Twitter.


