How to Set Up the Right Click on an iMac or MacBook Computer
This post may contain affiliate links which means I make a commission if you shop through my links.
Disclosure Policy
This tutorial will show you how to set up the right click on a Mac computer.
Unfortunately, Apple computers – iMac, MacBook Pro, or MacBook Air – do not come with the right click already set up on the mouse or trackpad.
Luckily, the solution is really easy – it is all in the Settings.
A Note About Your Mac OS Version
Creating a tutorial for setting up the right click has become a little tricky because the system settings will look a little different depending on the version of Mad OS you are running on your computer.
Luckily the process is very simple, and it is very similar no matter what version you have.
Also, if you have a laptop (MacBook Pro or Air etc), you will be setting this up for your trackpad. But for an iMac you will set this up for your mouse.
I will walk you through the process for both, step by step. But for reference, I am running the up to date version of Mac OS 15 – Sequoia on my iMac (my hardware does not support later versions) and Mac OS 26 – Tahoe on my MacBook Air.
Just a side note: If you are running an older version of Mac OS, don’t be alarmed at the jump in version numbers. Apple changed their numbering system when they released Tahoe to align with the year that is released in. So the versions do jump from 15-Sequoia to 26 -Tahoe with nothing, other than updates in between.
Ok, let’s dive in.
Step 1 – Find Mouse or Trackpad in Your System Settings
Click on the Apple icon in the upper left hand corner of the top menu bar on your screen and click on System Settings (previously called System Preferences).
In the left hand column, scroll all the way down to the bottom and you will see an option for “Mouse” if you have an iMac with a Magic Mouse.
If you have a laptop, do the same thing but instead you will see an option for “Trackpad” in that position. Click on that.
Step 2 – Access the Menu for “Secondary Click”
For me, this is slightly different for the iMac vs the MacBook Air. I am not sure if some of the differences are due to the Mac OS version or just because they are two different types of computers.
I will just tell you how I see it.
Setting Up the Magic Mouse Right Click on an iMac
You will come to a screen that has two options across the middle. The first one says “Point & Click”. Make sure that you are in this option (it should be highlighted in white), if not then click on it.
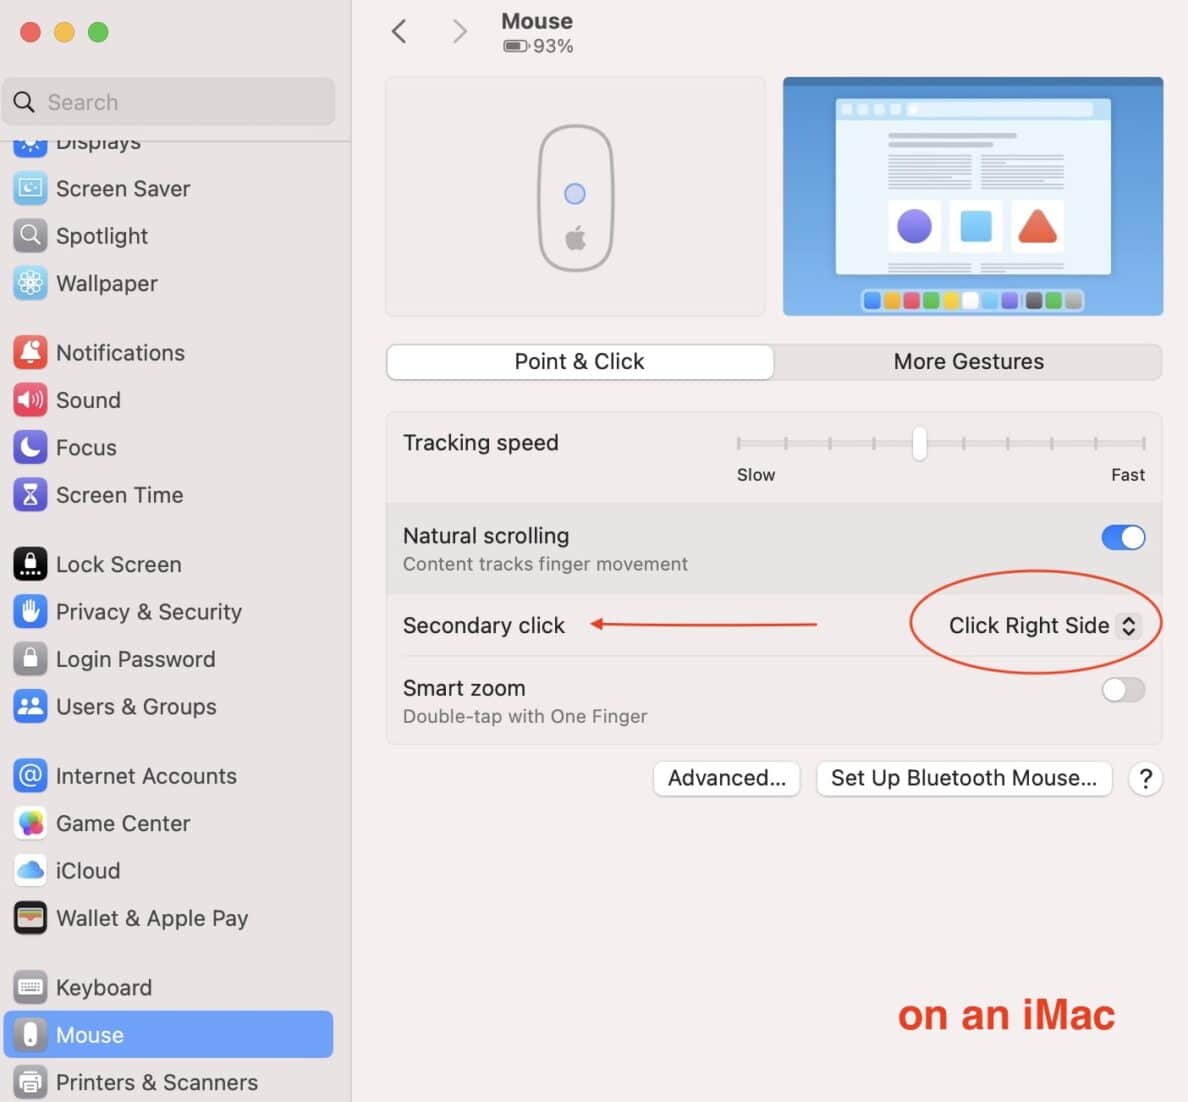
The third option down says “Secondary Click” – next to this is a dropdown menu that gives you three choices:
- off,
- click right side, or
- click left side
Setting up the Trackpad Right Click on a MacBook Air
On the MacBook Air you will see a three option menu bar across the middle. The first one says “Point and Click” and should be highlighted in blue. If it is not, click on it to select it.
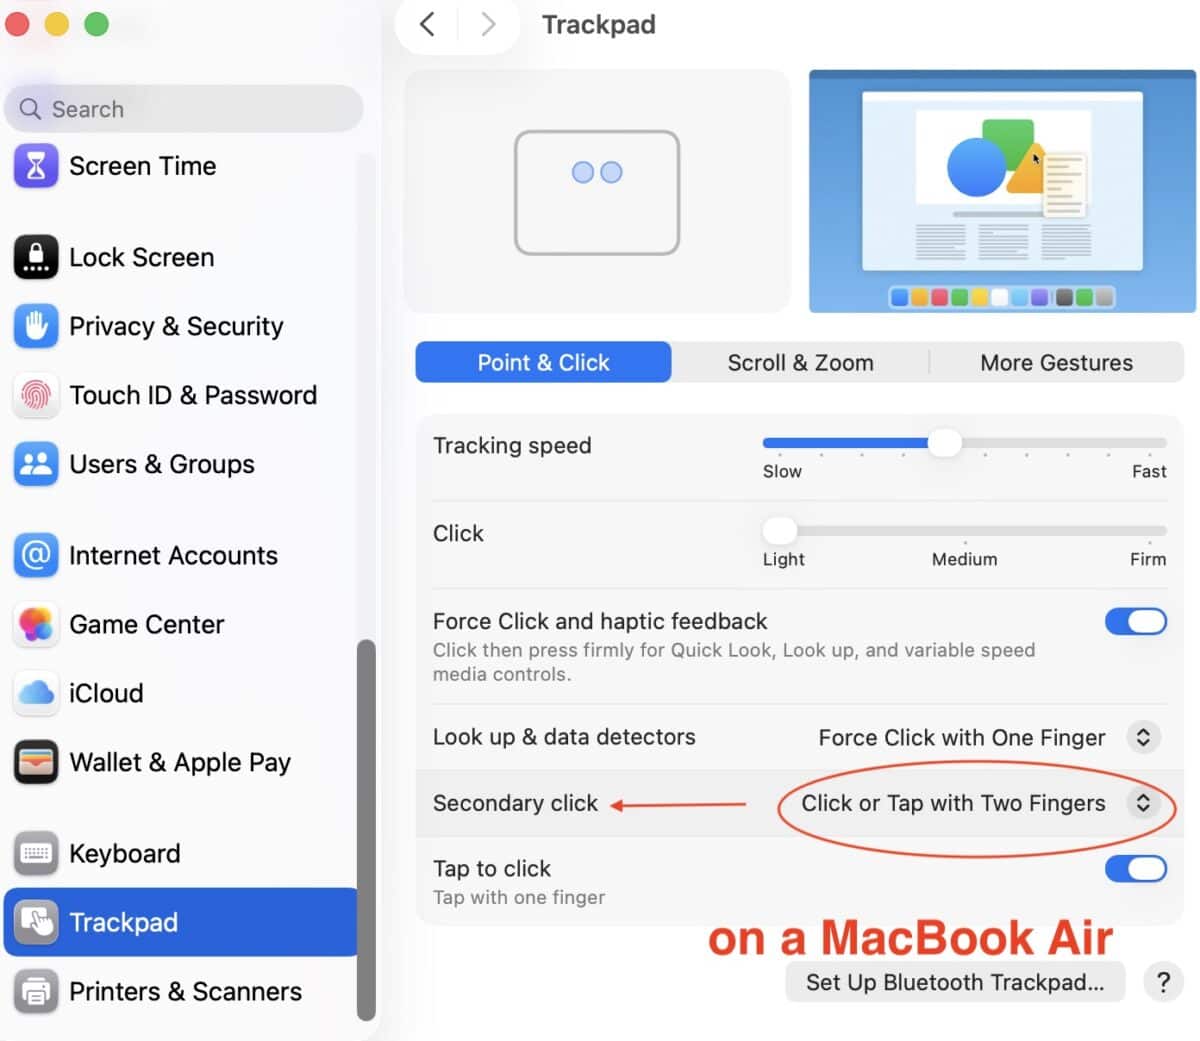
For me, the fifth option down is “secondary click”. To the right of these words is a dropdown menu with 4 choices:
- Off
- Click or Tap with Two Fingers
- Click on Bottom Right Corner
- Click on Bottom Left Corner
Step 3 – Choose Your Preference for Accessing the Right Click Menu
On the iMac with Magic Mouse, the choice is pretty easy. If you are right handed, you will most likely choose “click on right side” to access the secondary menu. And if you are left handed the opposite will apply.
But on a trackpad for a laptop, you have an addtional choice which is to “Click or tap with two fingers”. With this option you can click or tap with TWO fingers anywhere on your Mac trackpad to open the right click shortcut menu.
Personally, this is the one that I have been using for years and it is my preference over clicking on the bottom right or left corner.
Tapping with two fingers to get that right click menu to appear is great for a few reasons:
- you don’t have to hit a specific area on your trackpad to open the shortcut menu – anywhere on the surface will do
- you don’t need to press down and actually “click” the trackpad to access the menu – a simple two finger tap does the job
If you have never tried this option, give it a go and see how you like it. You can always choose a different option later.
And one more tip, if you don’t have “tap to click” set up I suggest you do that now as well – it is the first option below “secondary click” on the trackpad settings screen. This makes it so that you can tap the screen instead of applying pressure to use your trackpad to click on something.
Once you get into the habit of tapping and not having to press to click, you may find that your workflow becomes much easier. I know I did.
And that’s it!
What Does the Right Click Do?
If you are coming from a Windows computer – you know what the right click does. It opens a drop down menu with lots of useful options including copy and paste, etc.
On a Mac, opening this shortcut menu with the right click is disabled by default. So, straight out of the box you would need to hit your control button and click at the same time to see the shortcut menu.
When you click on the right side of your mouse or trackpad you want that little shortcut menu to pop right up so you can use the functions to copy, paste, access other apps, etc. The options in the shortcut menu will vary depending on what app you are using.
The major benefit of setting this up is that being able to access this menu with just a right click will save you valuable time and improve your productivity. Without it, everything you do on your computer is going to take you longer.
An important part of digital organization is learning how to use the technology that you already own, including all the little computer shortcuts to make work quicker and easier.
Other Ways to Access the Shortcut Menu
The funny thing is – if you have been using a Mac for a long time without setting up the right click shortcut menu, you may have even forgotten that you can actually open the shortcut menu with a simple click.
Instead, you just might be using the menu bar across the top of your screen or you might have gotten into the habit of using control click to access your shortcuts.
Both of these methods work but you are using precious seconds to perform these actions – and when you add them up over the course of the day or week or months – well, let’s just say that you could be more efficient.
Here is another little time saving tip that you can use to quickly organize your computer desktop.
What If You Don’t Like It?
After setting up the right click on your Mac, if for some reason you feel you don’t like it, you can always go back into your System Settings and switch it back to the way that it was before.
Let me know in the comments below if this Mac tutorial helped you out.


Thank you so much! Very helpful. 🙂
Hi Sarah,
You are welcome!