How to Make a Scrapbook – Actually Make the Book Itself
This post may contain affiliate links which means I make a commission if you shop through my links.
Disclosure Policy
Last weekend my daughter asked me if I had a blank scrapbook. Her friend is turning sixteen and she wanted to make an album for her as a gift.
Being the notebook fiend that I am, you would think that I would have something suitable lying around – but I didn’t.
Instead of shopping for something standard and ho hum, I set out to learn how to make a scrapbook and create something unique for this special occasion.
The result is what you see in the photo above.
If you like it, stick with me and I will try to explain how I did it.
What You Will Need
To get started you will need a few supplies.
I used
- 4 sheets of 12×12 heavy card stock
- a paper trimmer – I use this one
- 10 inch bamboo skewers
- coordinating ribbon (but twine works well, too)
- tacky glue
- a template to cut the notches (you can create your own or join my newsletter and grab mine from the Members Only Library)
- large eye needles for yarn or twine
- small cutting pliers to trim the skewers
Download the Template
Use the form above or at the end of this post to subscribe to my newsletter and grab the template from the FREE Member’s Library.
How to Make This Scrapbook
To get a general idea of how it’s done, watch this YouTube video. This is one that I used to learn how to make this scrapbook.
It’s really a unique idea, actually.
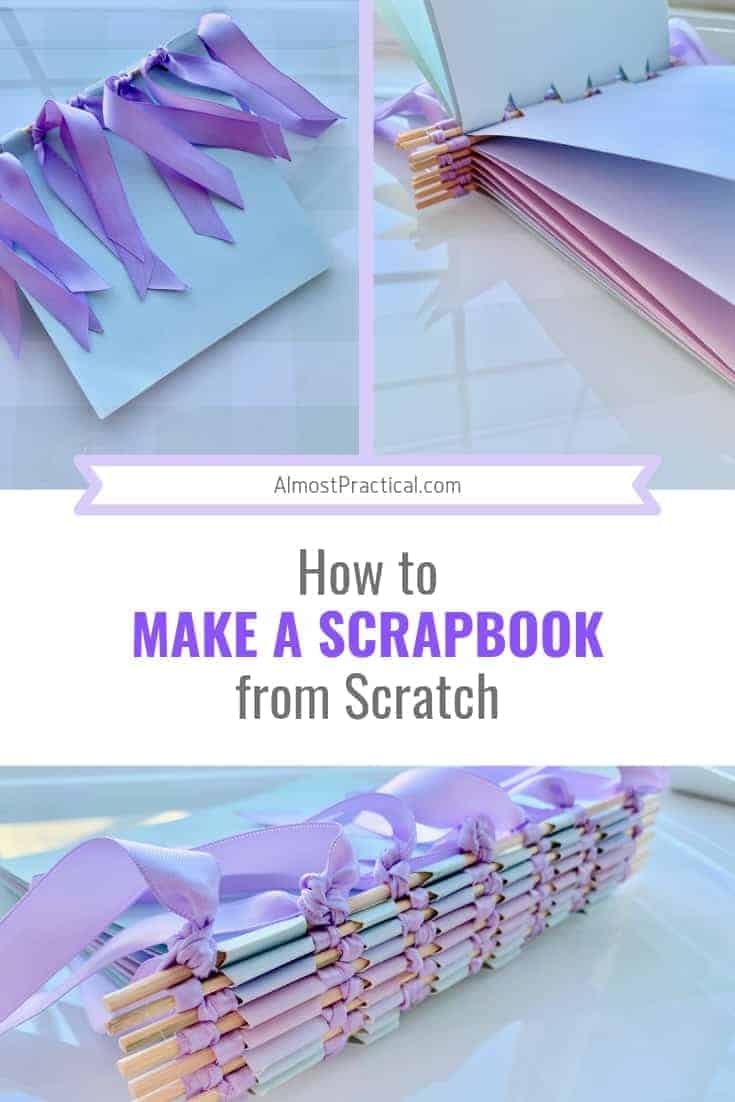
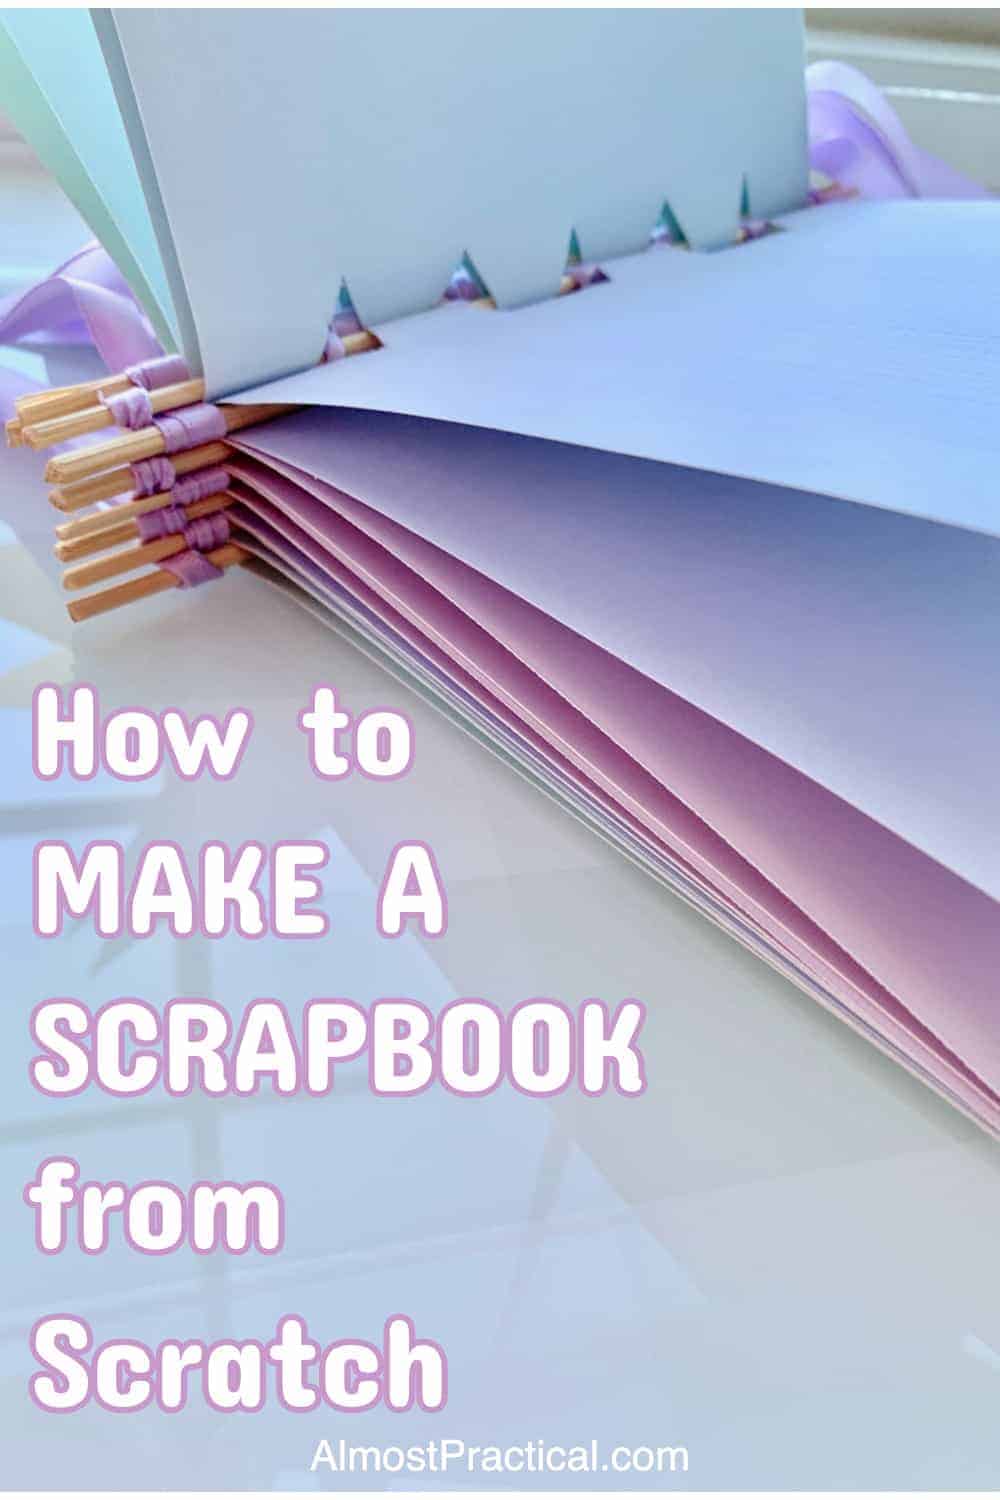
You basically weave your scrapbook pages onto wooden skewers. Together, these skewers create the binding for your scrapbook.
Choosing Your Scrapbook Papers
In the video, the artist made her scrapbook using very unique patterned papers in a grungy style.
I wanted more of a clean slate type of scrapbook.
My daughter planned to fill it with photos and memorabilia. So, I wanted her items to take center stage and let the scrapbook itself fall into the background.
I had a book of 12×12 cardstock in pastel colors that I picked up at Michael’s.
These papers were fairly sturdy, which you need them to be – otherwise they will rip when you weave them onto the skewers.
I chose 4 sheets, each in a different color. Because you cut them in half and then fold them in half – each color made a total of 4 pages. So my finished scrapbook had 16 pages altogether, including the front “cover” and back page.
I stacked the colors so that the same color was on the front and the back and then the second color in from the front and back were the same and so on.
Cut Your Pages
Once I chose the colors, I cut each page in half using my paper trimmer. So now I had 8 6×12 inch rectangles.
I then folded each one of these in half to make them 6×6 making sure to create a sharp crease. This was easy for me because my paper trimmer also has a scoring “blade” which creates a folding line without cutting through the paper.
Cut the Weaving Notches
Now you can create a template like the one in the video and cut out the notches.
If you’d like to use mine, I have it in my FREE Member’s Library. Simply use the form below to subscribe to my newsletter and as a benefit you will gain access to all the awesome printables in the library as well as the scrapbook template.
Line the template up with the creased edge of each of your folded pages, mark the notches and cut them out.
Weave the Pages Onto the Skewers
Next, you will weave the scrapbook pages onto your skewers.
For the first page:
- put the skewer through the first notch
- skip the second notch
- put the skewer through the third
- skip the fourth
- put the skewer through the fifth
- skip the sixth.
For the second page:
- put the skewer through the first notch
- pick up the second notch from the FIRST PAGE with your skewer (you will be skipping the second notch on the second page)
- put the skewer through the third notch in your SECOND PAGE
- pick up the fourth notch from the FIRST PAGE
- put the skewer through the fifth notch in the SECOND PAGE
- pick up the sixth notch from the FIRST PAGE
By doing this you will have skipped the second, fourth, and sixth notches in your second page. You will pick these up when you attach your third page, and so on and so forth.
When you have attached all the pages that you want, you will be left with the second, fourth, and sixth notches that you skipped on the last page that you added.
Just take a skewer and weave it through these empty notches to finish the scrapbook off.
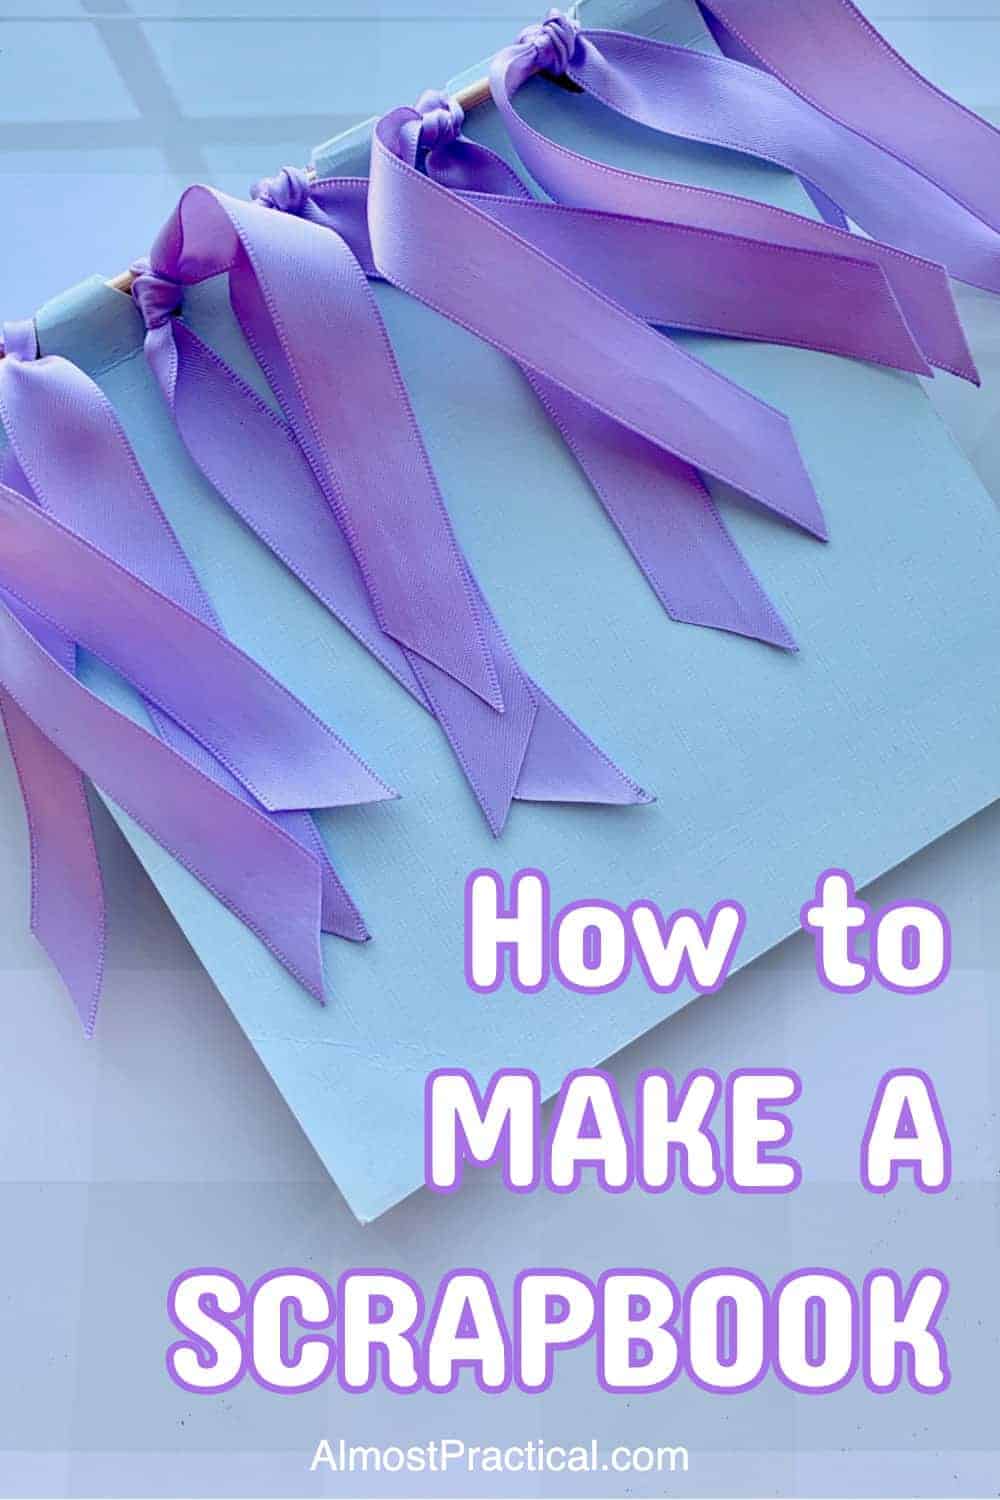
Firming Up the Binding
Now that your scrapbook is done, you want to firm up the binding so the skewers won’t slip out and your pages don’t fall off.
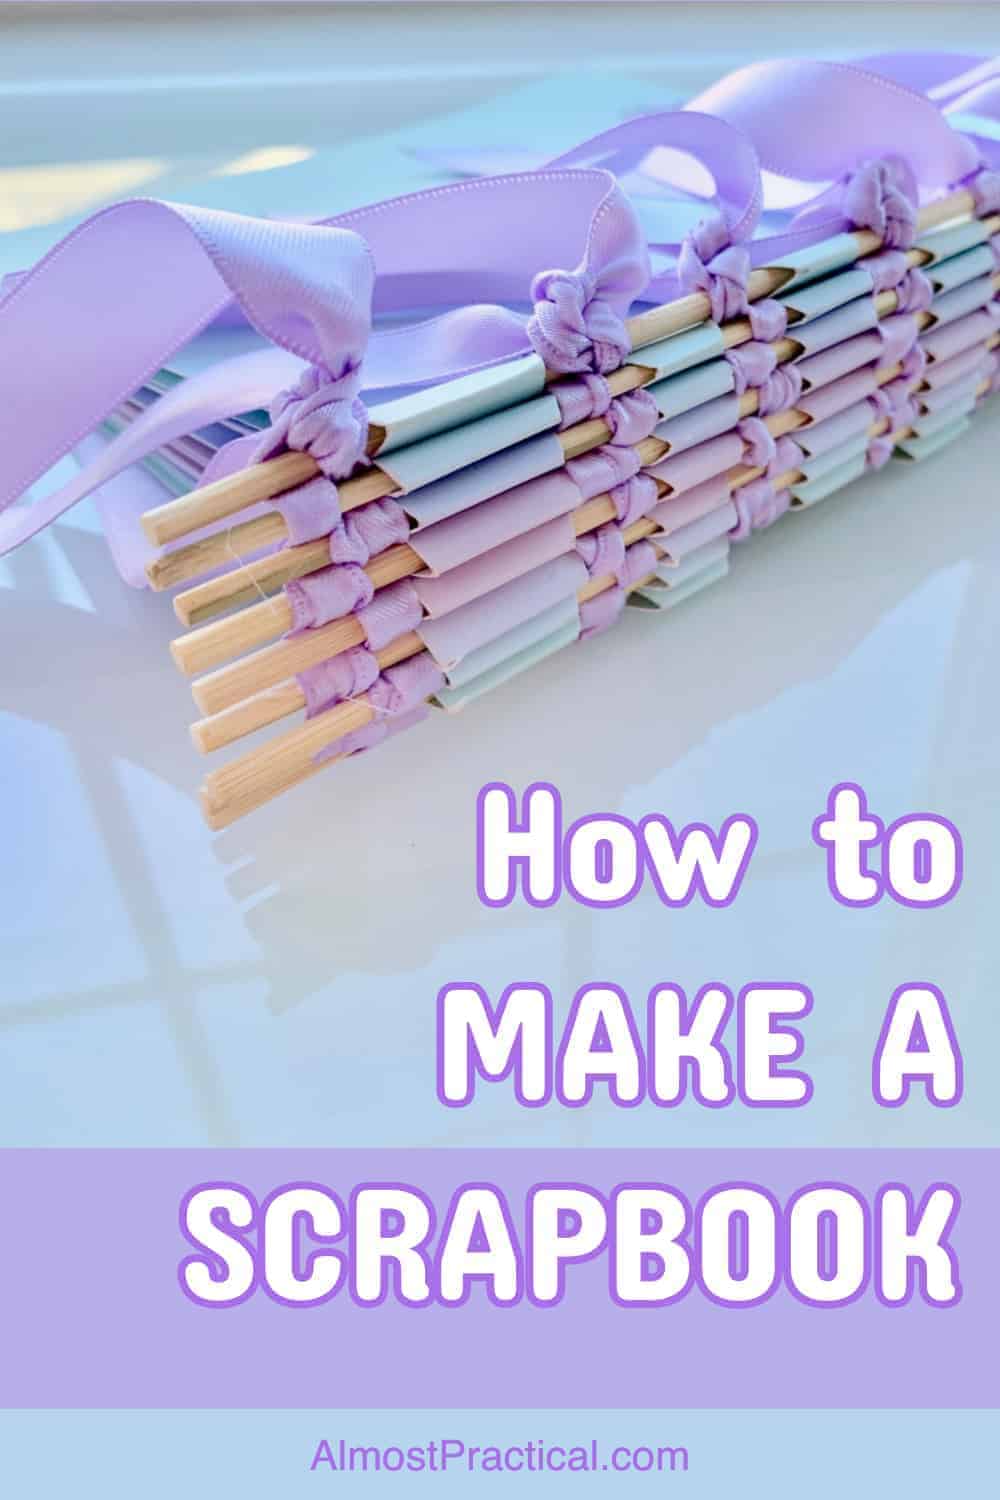
To do this, you will weave some twine or a ribbon back and forth on both ends of the scrapbook as well as in between each notch.
Make sure to leave a couple of inches of skewer sticking out at each end because the ribbon weave will take up some space on the skewer.
The ends are pretty easy, but when you go between the notches you will need a largish yarn type needle with a big enough eye to accommodate your twine or ribbon.
When I made the scrapbook pictured above, I first tried using wool yarn to bind the skewers (because I didn’t have twine in a color that would work).
Big mistake!
The yarn was so slippery that it slid right off the skewers.
Next I tried twine, which I had in red from Christmas. This worked really well – it just did not match my nice pastel scrapbook AT ALL.
Finally, I tried some pastel purple satin ribbon that I had in my stash of craft supplies. Honestly, I did not think this would be a good option because satin is kind of slippery to begin with.
But surprise surprise – the satin ribbon worked really well and it looked great.
To weave the binding, I started at the front of the scrapbook leaving a long tail. Then I weaved to the back and returned the weave back to the front, leaving another long tail.
I tied off the ribbon in the front with the first tail. This made sort of a ribbon fringe effect along the front which I liked.
In the video, the artist has added some fun beads and different color ribbons into her bindings. I could not figure out how to add beads and make them look as good as hers. Believe me, I tried.
Maybe on my next project.
As a final safeguard, I added a little drip of tacky glue to secure the weaved ribbons to each skewer on the outside ends of the scrapbook. I did not glue the ribbon in between the notches because I wanted to be able to open and close the book easily.
Cut The Excess Skewers
In the video, the artist leaves the skewers pretty long.
I did not like this look, so once my scrapbook was finished, I trimmed the ends using small cutting pliers.
However, when I cut the skewers, the force of the cut made the cut piece go flying – so wear eye protection when you do this!
Get Creative!
That’s about it! You can start with the video instructions on how to make a scrapbook and then totally make it your own, like I did.
Your imagination is the limit.
If you do make this, I would love to see it! Head on over to my Facebook page: http://facebook.com/AlmostPractical and post a photo.
Happy crafting!
Pin this article to your favorite board on Pinterest to refer to later.