Simple Cricut Valentine’s Day Cards That You Can Make Last Minute
This post may contain affiliate links which means I make a commission if you shop through my links.
Disclosure Policy

Here are some simple Cricut Valentine’s Day cards that you can make at the last minute.

If you have a Cricut machine then you know that any project takes a little bit of planning. Things don’t always work out the way you think they will the first time that you make the cut. Right?
So last night, my teenage daughter says that she’s decided to give out some Valentine’s Day treats to a few of her friends.
Of course, I jumped all over that – because I am always looking for excuses to create things with my Cricut Maker.
Watch the Video Tutorial
Honestly, I recommend that you watch the video tutorial that I made for this Cricut Valentine’s Day card because it is easy to follow.
You can find the project that I created in Cricut Design Space for these Valentine cards here.
Related Cricut Articles
- Learn what a Cricut machine is exactly – here.
- See my Cricut Maker unboxing here.
“Why don’t you give out Valentine’s cards, too?”
Now, for those of you with little kids – I’m jealous. If only I had a Cricut machine when my kids were little.
For teenagers – Valentine’s Day cards? – “mom, isn’t that a little “kindergarten”?”
Well, maybe not – if you keep it simple.
Imagine my surprise when she agreed! And that was followed by a bit of a sinking feeling with the realization that Valentine’s Day is tomorrow.
Um – how many Valentine’s do you need – and when do you need them by?
Yep – asap – and, oh, about 25.
So, together, we looked through Cricut Access and pieced together the cards that you see above.
Related: Is a Cricut Access Subscription Worth It?
I will give you the steps on how we created these simple Cricut Valentine’s Day cards – and then I will explain one way to make it even a little easier.
All of the cards are the more plain-ish ones in the stack.
But I dressed up the top card a bit (because I couldn’t resist) by embossing the top layer and attaching a small die cut heart both of which were done using my Cricut Cuttlebug machine (this has been discontinued but Sizzix makes a similar one here).
But you don’t need to do this to create the plain cards in the stack.
What You Will Need To Make These Simple Cricut Valentine’s Day Cards:
- Cricut Explore Air 2 or Cricut Maker Machine
- Subscription to Cricut Access
- 2 colors of cardstock
- glue stick
If you want to dress up your card with embossing and die cuts, you will also need:
- Embossing Machine
- Dots embossing folder or pattern of your choice
- Heart die cut or alternatively, use your Cricut machine to cut a small heart
- adhesive foam dots
Select Your Images and Text Options
To create the hearts – you could just choose the heart shape from the shapes option in Cricut Design Space.
However, with our cards – we started out making a different design and changed it part of the way through.
So, the heart that we used for our cards was part of this image (you will find it in the project linked here) through Cricut Access.
We originally wanted to use a different image but our cards are about 4×4 inches so the text cutout was too delicate and did not cut cleanly.
In addition, many of the centers of letters (like a’s and e’s) would need to be glued back in – which would have been very time consuming.
So, we went back to the drawing board, deleted the text (you can watch the video to see how we did this) and added in the text from the rectangular image that you see in my Valentine Card Project in Design Space.
The text in the second image worked much better than the first because it was chunky and the center of the letters were attached so to speak.
However, I did try to point out the main steps below as well.
Isolate the Heart
If you decide to use the heart in the first image you will need to isolate it.
To do this, select select the heart image and click on the contour button in the lower right hand corner of Cricut Design Space.
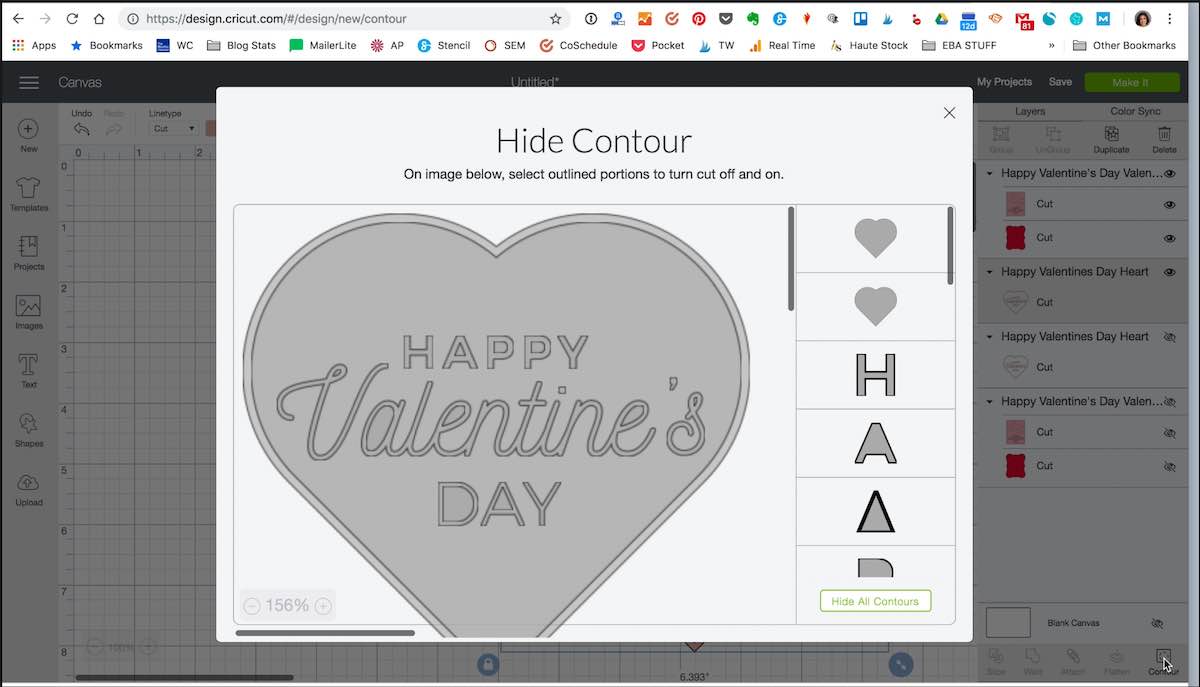
Now click the “Hide All Contour” button. This will leave you with just the heart shape and remove all the other cuts.
Isolate The Words on the Second Image
Now we will be using the text from the second image.
Isolating the text will take a few extra steps.
First, you need to ungroup the image and delete the back layer.
UPDATE from the Video
The funny thing about Cricut Design Space is the more you use it, the easier it gets. And you also find even more efficient ways to get things done.
So, I already recorded the Cricut tutorial above. And as I am writing this, I found an even easier way to work with this second layer.
So do this – go into the contours panel again and delete the hearts and faces and the very bottom layer – which is the rectangle background.
Hello – that leaves you with just the text!
Duplicate the Heart
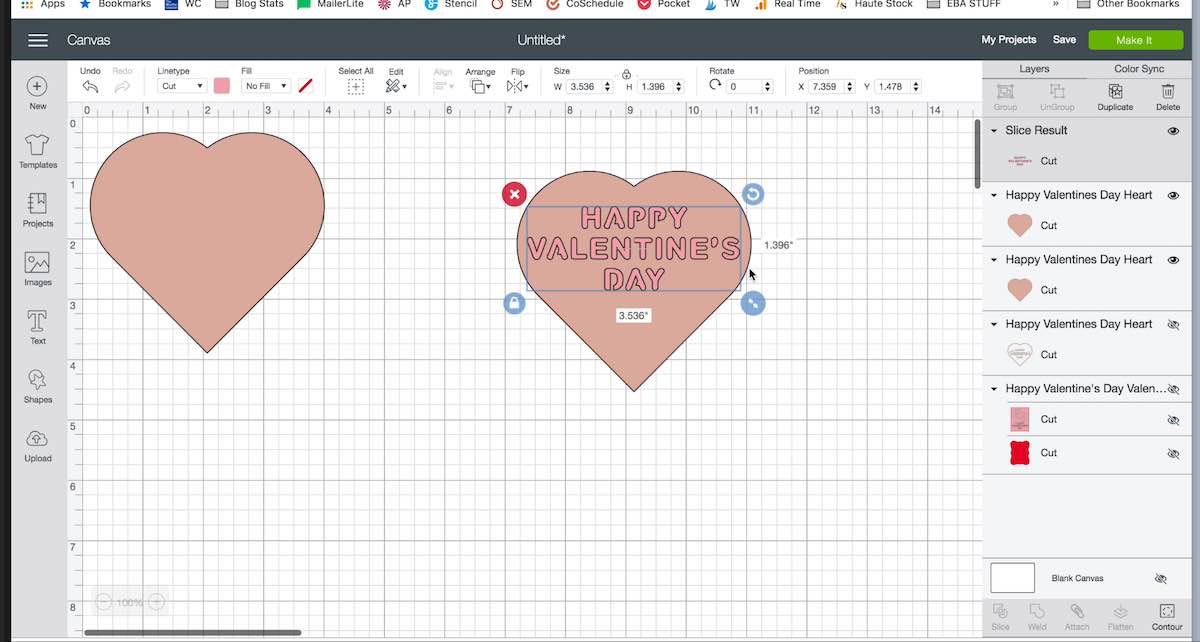
Now duplicate the heart from the first image.
Place your text over this new heart layer, select both layers, center them horizontally, and hit slice.
This will leave you with a heart that has the letters cut out.
Resize the Top Layer
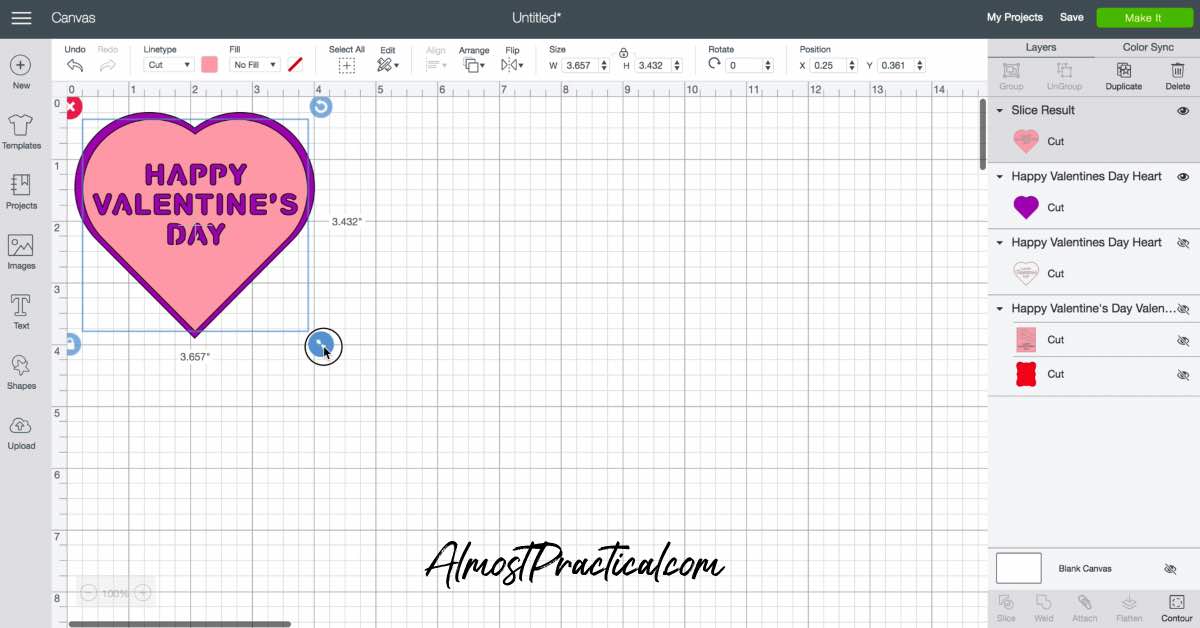
Now place the heart with cutout letters over the first heart and use the corner handle to resize the heart to be just a little bit smaller than the background layer.
This will make it so the background heart will form a border around the top layer.
Resize the Whole Project
If you want to make the entire card bigger or smaller, select both ofl the layers and group them. Then resize them all as a group.
Cut, Assemble, Emboss, and Decorate
Your layers are now ready to cut – so send them on over to your Cricut machine.
Now, you can either emboss the cutout layer using a Cricut Cuttlebug, or just glue the layers together.
You can add a written sentiment to the back of this Cricut Valentine’s Day card and decorate it with stickers, or small heart cutouts.
Enjoy!
Pin this article to your favorite board on Pinterest to refer to later.